
White Ink Label Printing: Substrates, File Setup & In-House Equipment
Learn how white ink or toner supports clear, dark, and metallic labels, how to build a white layer, and what to test for opacity, registration, and adhesion.

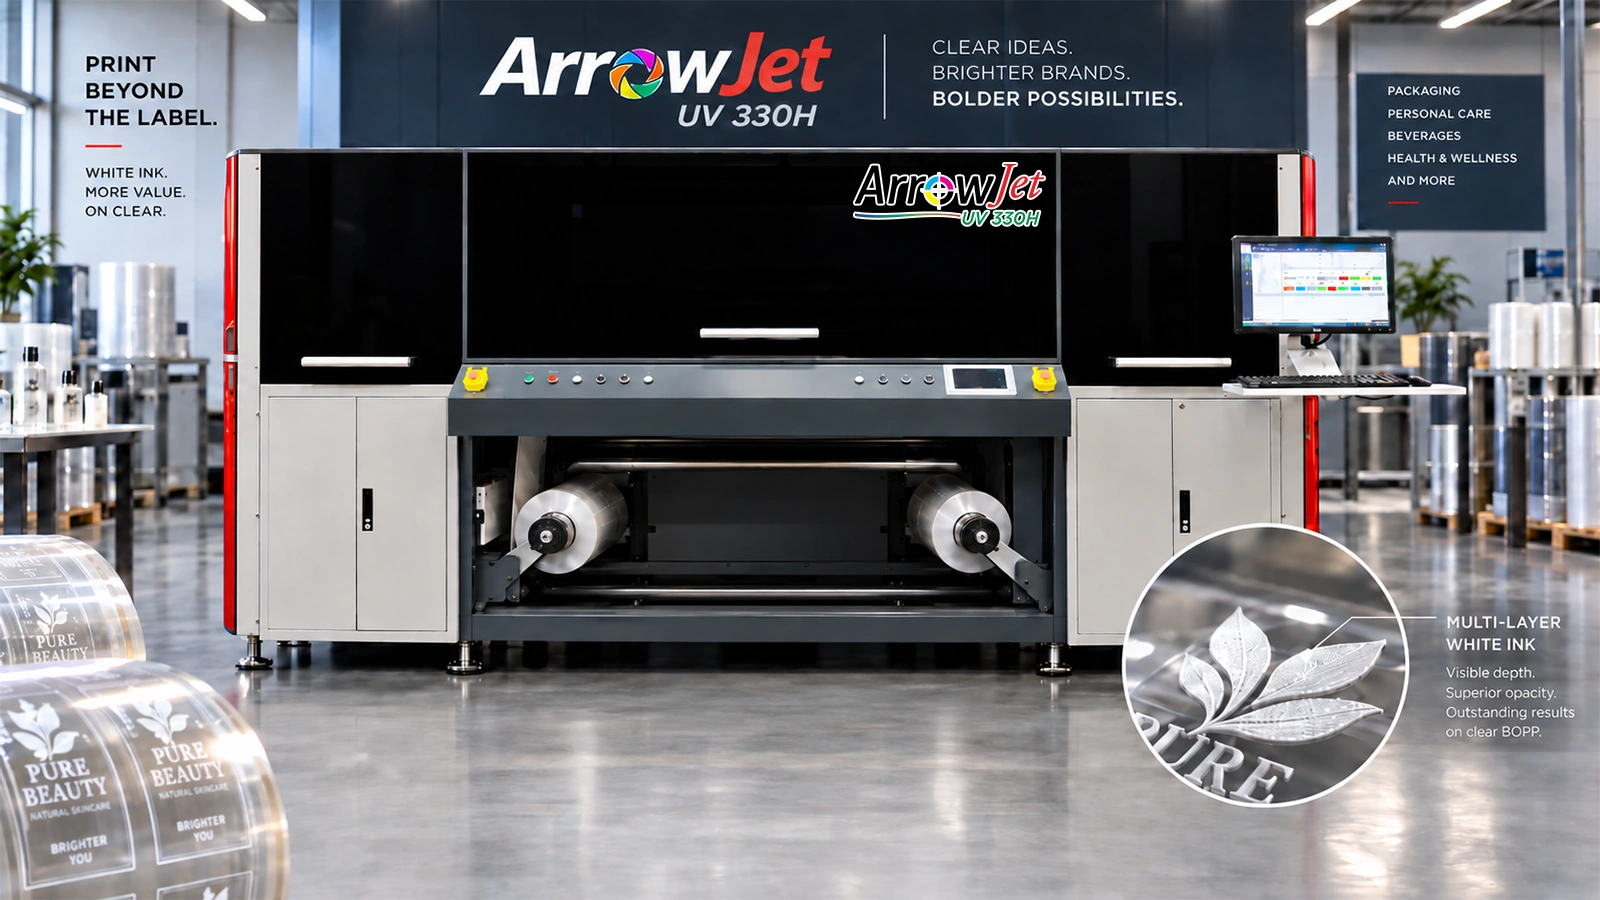
Standard CMYK printing cannot produce opaque white — white ink requires a separate channel on a press specifically built to support it. For labels on clear film, dark stock, and metallic substrates, white ink is not a finishing touch: it is a functional requirement that determines whether artwork is legible at all.
CMYK color mixing works by subtracting light — white cannot be mixed from cyan, magenta, yellow, and black. On white paper, the unprinted substrate provides the white base. On clear or dark materials, there is no white base available.
On a white paper label, the substrate itself acts as the white. CMYK inks are transparent by nature — they absorb certain wavelengths of light and allow the substrate color to show through the unprinted areas, creating the perception of white wherever ink is absent. This works perfectly on bright white stock.
On clear film, the same physics work against you. Any unprinted area reveals the container behind the label. CMYK colors, without a white underbase, appear translucent — the product inside the bottle or the color of the container surface bleeds through the label artwork, muting colors and making type illegible. On dark or black stock, CMYK colors become nearly invisible without a white layer beneath them to reflect light back through the inks.
The only solution is a printer with a physical white ink channel — a separate reservoir of opaque white pigment ink that is applied independently of the CMYK process. This is not a software setting or a firmware toggle on a standard CMYK press; it is a hardware capability built into the press design.
Not every label substrate requires white ink — but for several high-demand materials, white is essential. The table below maps substrate type to the white ink role it requires.
|
Substrate |
Why White Ink Is Needed |
Typical White Ink Role |
|
Clear BOPP film |
Transparent film shows the container surface through the label unless an opaque white layer is applied beneath the artwork. |
White underbase beneath CMYK |
|
Clear PET film |
Same physics as clear BOPP — high-clarity PET amplifies bleed-through on colored or dark containers. |
White underbase beneath CMYK |
|
Black or dark-colored label stock |
CMYK colors on a dark background have insufficient contrast — white underbase is required for colors to appear as intended. |
White underbase beneath CMYK; white highlight for design elements |
|
Metallic silver or gold film |
Metallic substrates allow designers to use the foil finish intentionally — white controls where the metallic effect shows through and where artwork remains opaque. |
Selective white underbase; design-specific application |
|
Holographic film |
The prismatic surface is visible through transparent ink layers — white defines opaque areas while allowing holographic zones to remain active. |
Selective white underbase for specific design zones |
|
Standard white BOPP / paper |
White ink generally not required — the substrate itself provides the white base for CMYK colors. White ink may be used for spot highlight effects on premium label designs. |
Optional — highlight or effect use only |
UV inkjet presses that support white ink use a physically separate printhead — or printhead array — loaded with opaque white UV-curable ink. The layer sequence, not just the presence of white, determines the final visual result.
In underbase printing, the white ink is deposited and cured before any CMYK layer is applied. This creates a fully opaque white foundation on the substrate surface. CMYK inks then print on top of the white layer, reacting with the white base the same way they would on a white paper label. This is the standard approach for clear film labels that need full-color fidelity across the entire design.
In highlight printing, white ink is applied after the CMYK layers have been deposited and cured. This places white on top of the color artwork — used when specific design elements need to be white and visible as a separate, opaque color against the substrate or against the CMYK artwork beneath. Common examples include white text on a dark label or a white overprint element on a metallic foil label.
Some UV inkjet press configurations support dual white channels — one pass for underbase, one for highlight — allowing both white functions in a single production run without a second pass through the press. This is particularly useful for labels that require both a full CMYK underbase and discrete white design elements on top.
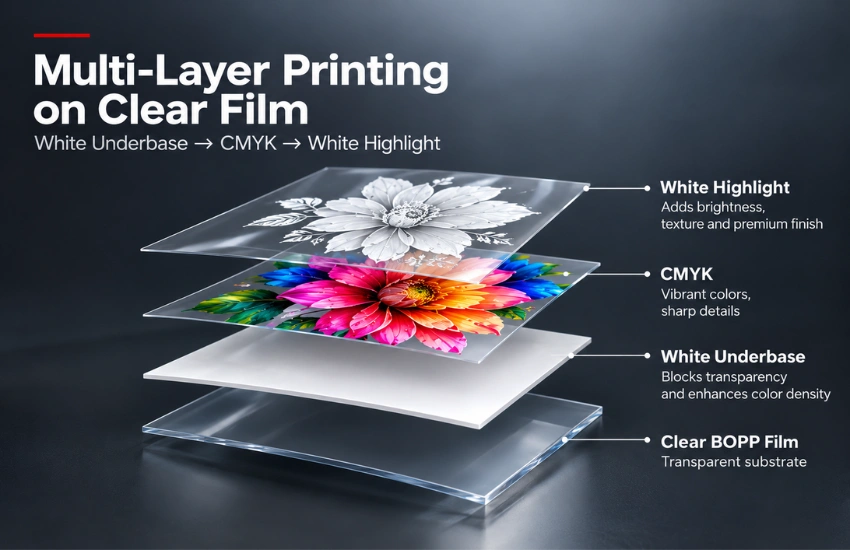
Between each ink layer, UV LED curing lamps immediately cure (harden) the deposited ink before the next layer is applied. This inter-layer curing prevents wet-on-wet color mixing between white and CMYK, ensures sharp layer boundaries, and allows precise registration across multiple passes. The result is a dimensionally stable, fully opaque label that adheres well to non-porous substrates including polypropylene, polyester, and specialty films — materials that water-based inks without UV curing would struggle to bond to reliably.
The press does not automatically detect which elements should print in white — the artwork file must explicitly define the white ink layer using a named spot color that the RIP can identify and route to the white ink channel.
Step 1 — Create a dedicated white layer in your artwork file
In Adobe Illustrator (the most common file format for label artwork), create a new layer and name it clearly — for example, “White Ink” or “White Layer.” Place all artwork elements that should print in white on this layer only. Keep this layer completely separate from your CMYK artwork layers to prevent any accidental color mixing or layer order errors.
Step 2 — Assign a custom spot color to the white artwork
Create a new swatch and define it as a spot color. The name of this swatch is critical: it must match the spot color name that your RIP software is configured to recognize as the white ink channel. Common names include “White,” “RDG_WHITE,” or a press-specific identifier — confirm the exact name required for your workflow before preparing production files. Color the artwork on your white layer with this spot color swatch.
Step 3 — Consider layer order for underbase vs. highlight
The position of the white layer relative to your CMYK layers tells the RIP and press how to sequence the output. For underbase white, the white layer should be positioned below the CMYK layers in the file — the press prints white first, CMYK second. For highlight white, the white layer sits above the CMYK layers. For a combined underbase and highlight approach, some workflows use two separate white layers with distinct spot color names; confirm this with your RIP operator or equipment supplier.
Step 4 — Verify overprint and transparency settings
Ensure the white spot color swatch is set to overprint where appropriate — white overprinting on a dark substrate needs to knock out (replace) the background, not multiply with it. Check all transparency settings and flatten the file before exporting to PDF if your workflow requires it. Artwork with active transparency effects or live effects can produce unexpected results at the RIP stage.
Step 5 — Proof on the actual substrate before production
White ink opacity, color shift from the substrate surface, and edge definition can all vary between substrate types. Always run a test print on the target substrate to confirm opacity, registration between white and CMYK layers, and overall design appearance before committing to a full production run.
File preparation requirements vary by press, RIP configuration, and workflow. Confirm all naming conventions and file specifications with the production team or equipment supplier before preparing production-ready files.
Label converters and brand owners bringing white ink printing in-house need a press that can handle multi-layer UV printing across a range of specialty substrates — not a modified CMYK system.
The ArrowJet UV 330H is Arrow Systems’ hybrid UV label press designed for white ink, varnish, and multi-layer label production. It supports three printing configurations purpose-built for specialty label work:

Unlike a conventional roll-only label press, the UV 330H combines roll-to-roll productivity with flatbed printing in a single platform. Operators can switch between standard roll label production and flatbed printing on sheets or rigid substrates without changing machines. The flatbed mode supports media up to 50 mm thick, opening production capability for specialty promotional pieces, sample sheets, and rigid label stock.
Precise registration across white and CMYK layers is non-negotiable for white ink production — any misalignment between the white underbase and the CMYK artwork above it creates visible color errors at the label edges. The UV 330H uses a zoned inspection vacuum bed to hold media flat and maintain accurate registration across all ink layers, including white, throughout the full press run.
The UV 330H prints on a broad range of label substrates relevant to white ink production: clear BOPP, clear PET, metallic films, specialty films, standard label stocks, and rigid boards in flatbed mode. Maximum print width is 330 mm on roll media; the flatbed area extends to 350 mm × 1,500 mm for sheet work. See the full range of ArrowJet UV label press configurations to compare options for your production volume and application mix.
For operations evaluating in-house digital label printing across multiple substrate types, the UV 330H’s multi-layer ink configuration support and hybrid media handling reduce the need for separate machines for standard and specialty label runs.
Assuming a CMYK-only press can produce opaque white
Standard CMYK digital presses — including entry-level inkjet and toner systems — have no white colorant in the ink set. No driver setting, RIP configuration, or ink profile can create opaque white on a CMYK-only system. White ink printing requires a press with a physical white ink channel.
Failing to separate white and CMYK artwork in the file
White artwork mixed into CMYK layers cannot be isolated by the RIP for routing to the white channel. Any white elements in the CMYK artwork will output as absent ink (transparent) on clear or dark substrates rather than as opaque white. The white spot color must be on its own dedicated layer with its own named swatch.
Using the wrong spot color name for the white channel
The RIP identifies the white ink channel by matching the spot color name in the file to its configuration. A mismatch — even a single character difference — causes the white channel to be ignored or misrouted. Always confirm the exact spot color name required for your press and RIP combination before preparing production files.
Not testing opacity on the actual production substrate
White ink opacity varies by substrate surface energy, ink pass count, and UV curing parameters. A white opacity level that looks adequate on matte BOPP may be insufficient on a high-gloss clear PET. Always run test prints on the target substrate at the target ink pass setting before approving a design for production.
Skipping a test print before a full production run
Registration accuracy between white and CMYK layers, color accuracy on the actual substrate, and edge definition of the white boundary all need physical verification before committing to production quantities. A single test print is a low-cost insurance step that prevents reprinting an entire run.
Yes, but only with a press that supports a dedicated white ink channel. Standard CMYK inkjet and toner printers do not produce opaque white — the ink system simply has no white colorant. UV inkjet presses configured with CMYK plus white are specifically designed for this purpose. The white layer is printed first (as an underbase beneath CMYK) or last (as a highlight layer on top), depending on the design intent. Without a white channel, CMYK colors on clear film appear translucent because the substrate shows through.
Clear BOPP and PET films, black and dark-colored stocks, metallic silver and gold films, and specialty materials such as holographic or brushed metallic films all require white ink when the design calls for opaque elements. On clear film, white ink creates the opacity needed for CMYK colors to appear correctly. On dark substrates, white provides contrast so the design is legible. On metallic films, white controls where the metallic finish shows through and where artwork remains solid and opaque.
White ink is typically defined as a custom spot color in the artwork file. In Adobe Illustrator, the standard approach is to place all white artwork on a dedicated layer, assign a custom spot color to it (commonly named “White” or a RIP-specific name your workflow requires), and confirm the spot color name with the RIP software being used. The RIP interprets the named spot color as the white ink channel during output. File preparation requirements vary by press model and RIP — always confirm naming conventions and layering rules with your equipment supplier before producing files.
A white underbase is printed first, beneath the CMYK color layers. It creates an opaque white foundation that allows CMYK inks to develop their full color value — essential on clear or metallic substrates where the background would otherwise show through. A white highlight is printed last, on top of the CMYK layers, to create white design elements that sit above the color artwork. Some presses support both sequences in a single pass using dual white channels, enabling both underbase and highlight white in the same label without a second press pass.
In-house white ink label printing requires a digital press with a dedicated white ink channel — not a standard CMYK-only system. UV inkjet presses configured with CMYK plus white are the standard platform for this application because UV-cured inks adhere well to non-porous substrates including clear films, metallic foils, and specialty materials. A compatible RIP that can manage the white channel output and layer sequencing is also required. Arrow Systems offers the ArrowJet UV 330H, a hybrid UV label press engineered for CMYK, white, and varnish printing across roll media and flatbed substrates.
The ArrowJet UV 330H is a hybrid UV label press built for CMYK, white, and varnish production on clear films, metallic substrates, and specialty materials — all from a single machine. Arrow Systems is a label printing equipment manufacturer based in Niagara Falls, NY.
Learn how white ink or toner supports clear, dark, and metallic labels, how to build a white layer, and what to test for opacity, registration, and adhesion.
Explore the practical benefits of digital label printers: short runs, versioning, variable data, inventory control, faster response, and integrated finishing.

Learn how flexible packaging is used, how pouches and rollstock differ, which barrier and seal questions matter, and where digital printing fits.
Compare laser and analog label finishing by tooling, changeovers, materials, run length, quality, workflow, and total cost before selecting equipment.

Table of Contents Arrow Systems to Exhibit at LOUPE Americas 2026 Chicago, IL — Arrow Systems Inc. will exhibit at LOUPE Americas 2026, taking place
Table of Contents Overlaminate vs. Varnish Labels: How to Choose Protection Film overlaminate protects against immersion, wash-down, and solvents; UV and aqueous varnish suit retail